
You might have seen some photos of pine resin that I posted a while back. I was on the hunt for some wild-grown resin to harvest and add to a few of the things I was making.
Pine resin is one of my favourite thing to work with- not only for its amazingly uplifting fragrance, but also for its medicinal properties which, I believe, have gone somewhat by the wayside in recent times.
The pine is strongly antimicrobial and antiviral. In a way it can be compared to the Australian Eucalyptus- in the sense that it can be applied topically as a disinfectant or prepared in the form of an inhalation to help clear infections of the respiratory tract and sinuses.
Pine is also what we call a ‘counter-irritant’, meaning that it has the ability to increase blood flow to the area of which it has been applied.
For those who have heard of Black Salve, or drawing ointments, the old folk remedy of ‘pine tar’ (pine resin) is well known for its ability to do the same sort of thing- when applied to a deep-seated splinter, or even something like a boil, pine resin will very quickly appear to ‘draw’ the splinter out and form a blister on the surface.
It does this by stimulating blood flow, and therefore the immune system, to the site, and encouraging the body to do what it does naturally- push foreign bodies out through the skin!
The same warming/stimulating properties can make pine resin a first class herb when included into a chest rub for congestion. It can also help with localised pain and inflammation (for example the joints), when combined with other specific herbs.
In most temperate parts of Australia, pine is relatively easy to find growing. The resin, or sap, is produced by the tree and is literally its ‘life blood’… and just as we form clots over a wound when our skin is cut or damaged, so too does a tree, meaning that they use their sap/resin to help them seal and heal any ‘wounds’.

Collecting Pine Resin
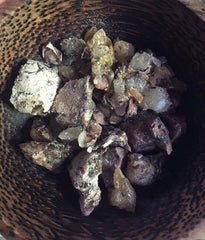
Collecting resins can be done in a couple of ways, either by deliberately scarring the tree and returning at a later day -or you will more than likely be able to find naturally- produced resin on wounded areas of the tree- such as where a branch has broken or fallen out, or really any form of damage to the trunk (or even surface roots).
The resin will vary in colour, depending on how old it is… Here I have shown the various stages and ways the resin can present on a tree.
The more liquid it is, the fresher it is. This is also the easiest stuff to collect, and potentially has the highest levels of volatile oils still in tact, because it has been exposed to the least amount of sunlight and heat (both of which degrade these).

When you go to collect the resin, I suggest you use a knife and a container such as a jar or tin- Pine resin is VERY sticky, and it wont take long before you glue your entire hand to anything it touches! Oh, and for the record, the resin is oil-soluble, so you might be able to use an oil such as olive oil to dissolve it off your knife. Otherwise alcohol or methylated spirits is the way to go.
If you’re anything like me and completely impatient(!), you will more than likely end up with a jar full of resin, but also bits of wood, bark, twigs and maybe even the odd ill-fated insect! Stuff you really don’t want to transfer into any remedy you might prepare… So before you can use it, you need to refine the resin and remove as many impurities as you possibly can.
Refining your resin
Commercially, chemical solvents are used to separate the resin from the other bits, but in the true spirit of wild herbalism, I prefer the good old heat-extraction method. Yes, its slow… yes, it can be messy… but if you are smart about it, it really isn’t all that bad!
My preferred method is called the ‘double-boiler’ method, meaning, you choose a large, tempered jar that you are willing to sacrifice to the pine resin gods, and this is now your permanent refining vessel.
- First thing you want to do is break it all up into the smallest pieces you can manage– this really just speeds up the whole process. (Left photo).
- From here, I have poured a small amount of olive oil over the pine pieces (Middle photo), but that’s only because I was planning on using this resin in a salve. If you prefer to keep the resin true, skip this step and simply place the jars lid VERY LOOSELY onto the jar. This is so that you contain all of the volatile oils when the stuff heats up. If you had no lid, all the good bits would simple evaporate – although your house would smell amazing!
- Place the jar(s) into a large boiler or slow cooker, and fill the whole thing with water up to the level of where the resin sits. (I try and keep it to half way). (Right photo).
- Place the boiler lid on, and put the whole thing over a low to moderate heat. This will take anywhere from 3-8hrs, depending on how much resin you have, the jar thickness, etc..

5. Once the resin has softened and begun to turn into a liquid consistency, you can drain off the liquid into another clean tempered glass jar, leaving the crud (woody bits and insects) at the bottom of the original jar.
(This jar is then your stock of refine pine resin, ready to drop into your remedies when required.)
This resin will keep on its own for well over a year, due to its antimicrobial properties. So if you are keen in giving pine resin a spin in your remedies, my suggestion is that you collect enough up to do a large batch of it that will keep in your cupboard for a long period of time. This will save on time and mess, and give you an excellent go-to for those times you really need it.

Oh… and one more thing… that crud at the bottom of your jar??? It makes an EXCELLENT natural firelighter, and will burn slowly for a period of time. Even in a crude way, it could be divided into small sections and burned as incense. YUM!
Join to my potioners community to know more tutorial like this one!